89 Elite R - my first build
Moderator: Moderator


Re: 89 Elite R - my first build
the adapter plate is much larger, but its for a spree, so there is only 2 holes that go to the block from the plate, then the stock 4 go to the adapter. ill upload a pic of the space i got.

Re: 89 Elite R - my first build
Update- stock screws work. So this weekend I'm going to see how hacking this thing up goes.
Re: 89 Elite R - my first build
New throttle cable went in with relative ease:

And here is the custom oil plug (just grinned off the gears and then sanded the shaft):

And here is the custom oil plug (just grinned off the gears and then sanded the shaft):
-
tazland001

- Board Supporter

- Posts: 1218
- Joined: Thu Apr 30, 2009 11:46 pm
Re: 89 Elite R - my first build
Looking good. Sorry for the late reply. The jet I sent you is actually a 95 for when using the carb kit for the spree. It would be a little lean for your application. You should be fine with the stock jet in the 21mm carb but if not I will help you dial it in.
As far a using the old reed cage for an adapter plate. I think that is a great idea. Just strip the old reeds out and open it up a bit and you should be fine.
Taz
As far a using the old reed cage for an adapter plate. I think that is a great idea. Just strip the old reeds out and open it up a bit and you should be fine.
Taz
Re: 89 Elite R - my first build
Quick questions, the long bolts that hold the head and jug on do i need to locktite those?

Re: 89 Elite R - my first build
no, just put some oil on the threads and torque them down
1986 Spree/ Eve af16 swapped 65cc Prodigy vari 8g 9:1 Ruima gears
21mm OKO 42/100 32:1 45mph kymco zx exhaust
1994 Elite S 17.5mm Arreche, Daytona reeds, SEF ramp, pump plugged
1987 Elite SE50 af16 swapped
1989 Elite E SB50p
2003 Yamaha Zuma
21mm OKO 42/100 32:1 45mph kymco zx exhaust
1994 Elite S 17.5mm Arreche, Daytona reeds, SEF ramp, pump plugged
1987 Elite SE50 af16 swapped
1989 Elite E SB50p
2003 Yamaha Zuma
Re: 89 Elite R - my first build
s***, I didnt oil the threads, will this mess stuff up?
-
tazland001
- Board Supporter
- Posts: 1218
- Joined: Thu Apr 30, 2009 11:46 pm
Re: 89 Elite R - my first build
No you will be fine.
Its about time your back on here posting some more pics. hehe
Taz
Its about time your back on here posting some more pics. hehe
Taz
Re: 89 Elite R - my first build
Got work done late last night. After trying to track down a machine shop competent enough to do the head, only one say they would "try" but denied any accountability if something were to go wrong, where its not something they normally do.
Long story short for the time being the head is not getting done. Now when I bolted everything down and double and triple checked, the piston does not touch the head at all, so I should be fine there.
For some success of the evening, My old reed block made the perfect adapter plate after some tedious filing:


and the gap is covered

and the final product:

Now I put more components back together, hopefully getting the motor bolted back to the frame this weekend.


Long story short for the time being the head is not getting done. Now when I bolted everything down and double and triple checked, the piston does not touch the head at all, so I should be fine there.
For some success of the evening, My old reed block made the perfect adapter plate after some tedious filing:
and the gap is covered
and the final product:
Now I put more components back together, hopefully getting the motor bolted back to the frame this weekend.
-
tazland001
- Board Supporter
- Posts: 1218
- Joined: Thu Apr 30, 2009 11:46 pm
Re: 89 Elite R - my first build
So when you tightened the head down and spun the fan blade in a full rotation the piston did not smack into the head??
Also the old reed cage worked very well. Its funny because I dont recall anyone using that same approach. Now people can just use the old reed cage for an adapter plate. Nice job.. Cant wait to see some test run results.
Taz
Also the old reed cage worked very well. Its funny because I dont recall anyone using that same approach. Now people can just use the old reed cage for an adapter plate. Nice job.. Cant wait to see some test run results.
Taz
Re: 89 Elite R - my first build
Head doesnt smack at all. the piston sits just a shade under the jug, so that combined with the head gaskets give it the room it needs.tazland001 wrote:So when you tightened the head down and spun the fan blade in a full rotation the piston did not smack into the head??
Also the old reed cage worked very well. Its funny because I dont recall anyone using that same approach. Now people can just use the old reed cage for an adapter plate. Nice job.. Cant wait to see some test run results.
Taz
The read block actually worked great, i needed to hack one of the gaskets that were for the other adapter, and added a little gasket maker myself, but overall not too hard. I also put the oil pump with the grinded off gear back in to act as a oil plug. I might get some more done tonight when I get home from work. At this point I can bolt it back up to the frame where Im only waiting on a variator.
Re: 89 Elite R - my first build
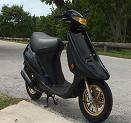
Is there a nut that goes on the bolt that holds the shock to the motor?

Re: 89 Elite R - my first build
Should be threads on the shock mount if I'm not mistaken. Nice job on the build.  Really nice oil plug! Thanks for posting all of the pics! Hope you get to ride it this year.

Really nice oil plug! Thanks for posting all of the pics! Hope you get to ride it this year. Honda Elite SR
Honda Elite-Dio ZX
Dio ZX Headlight/Disc Brake Mod: http://hondaspree.net/phpBB3/viewtopic.php?t=30861
Honda Elite-Dio ZX
Dio ZX Headlight/Disc Brake Mod: http://hondaspree.net/phpBB3/viewtopic.php?t=30861
Re: 89 Elite R - my first build
Got a lot done last night.
Got the motor back on the frame:

Got the throttle cable connected to the carb and adjusted:


break and back tire is back on

I had use for the extra hex bolts that came with my carb kit

which is bolting the exhaust to the motor, easier to deal with them than getting a socket in there when everything is put together:

The exhaust side panel is back on, along with the floor and other plastics.
and only 1 panel left to go on after I do some test runs and "tuning"

here's hoping it works!
Here is a pick with the last panel on, but not bolted down. I do want to cut them more so I can see the pretty motor

Got the motor back on the frame:
Got the throttle cable connected to the carb and adjusted:
break and back tire is back on
I had use for the extra hex bolts that came with my carb kit
which is bolting the exhaust to the motor, easier to deal with them than getting a socket in there when everything is put together:
The exhaust side panel is back on, along with the floor and other plastics.
and only 1 panel left to go on after I do some test runs and "tuning"
here's hoping it works!
Here is a pick with the last panel on, but not bolted down. I do want to cut them more so I can see the pretty motor