Page 2 of 3
Re: Stock boost channel
Posted: Thu Jan 01, 2015 7:12 pm
by curtis966
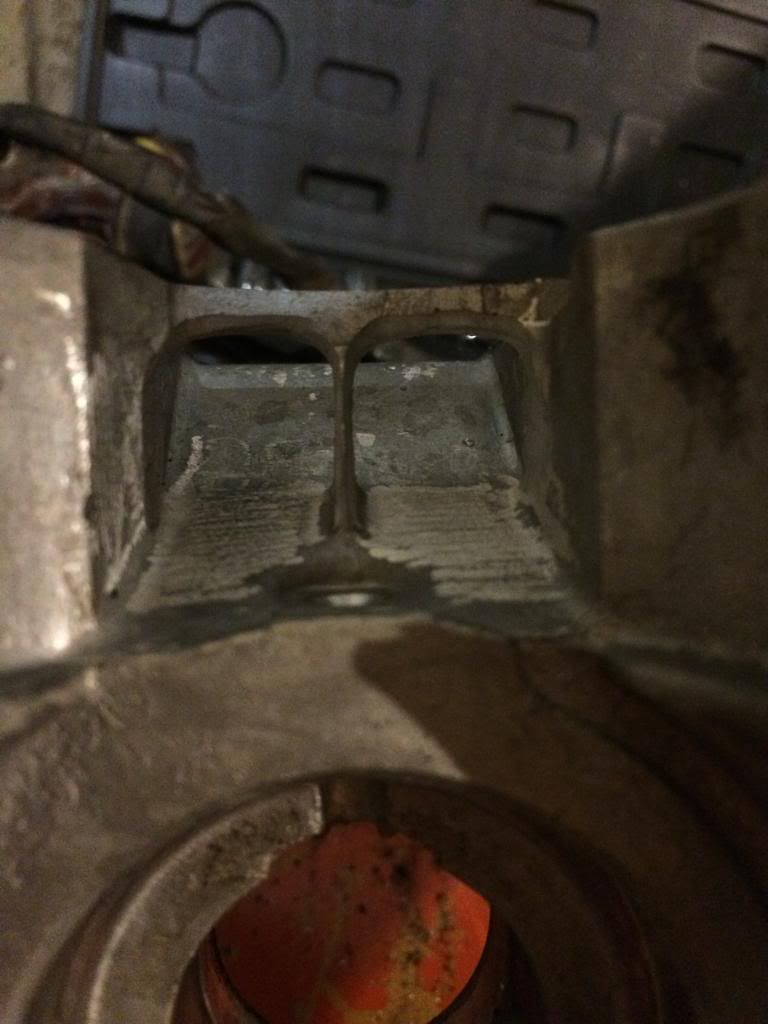
All looks pretty good man nice work. On the intake I would bring the center piece to a knifes edge so it doesn't block so much flow. And there is a little triangle just past the intake windows towards the front of the motor that messes with airflow from the transfer ports. Did you get that smoothed out? It kinda looks like it but hard to tell from pics.
Re: Stock boost channel
Posted: Thu Jan 01, 2015 7:13 pm
by DirtyE
I will take a look at that area. I didn't touch things there because I wasn't sure where the crank is gonna top out. From what I understand, you don't want the transfers moving mixture too low. I wasn't sure whether I should rough up the intake side transfer or smooth it out. Just like knife-edging, smooth vs. rough is debatable. It seems to me that polished would be ideal, but im open to suggestions in this area.
Re: Stock boost channel
Posted: Thu Jan 01, 2015 7:26 pm
by curtis966
I leave my entire intake track from the intake its self all the way to the crank with a cats tongue roughness. You want the fuel and oil to catch and mix together. I believe this is what most people will say. If it's polished nothing will stick. I'm sure there's more to it but that's just what I've learned.
Re: Boost and intake modifications
Posted: Thu Jan 01, 2015 7:32 pm
by curtis966
Here's the best pic I have from my stroker intake. It's nice like a sandpaper roughness and I shaved both sides for the center post to a edge.
Re: Stock boost channel
Posted: Thu Jan 01, 2015 7:44 pm
by DirtyE
I guess I can go higher on my intake bridge. (I threw a quick knife edge before snapping the pic)
Re: Boost and intake modifications
Posted: Thu Jan 01, 2015 7:58 pm
by DirtyE
Thanks! I was looking at the way the CT manifold mates to the intake earlier today, and noticed that if I wanted a completely smooth transition into it, I would have to bring the bridge of the cases intake almost all the way up. Now that I can see curtis' intake and how much higher he brought his up in the rear, I'm thinking I may angle the front of the bridge all the way up to the CT and leave the back thick for support.
Re: Boost and intake modifications
Posted: Thu Jan 01, 2015 8:04 pm
by DirtyE
A CT manifold mating with dio cases. You guys think I could cut the bridge up that high in the front, then leave the back full and have enough support?
Re: Boost and intake modifications
Posted: Thu Jan 01, 2015 10:14 pm
by curtis966
Mine is cut all the way to match with the ct. Just like your talking about.
Re: Boost and intake modifications
Posted: Fri Jan 02, 2015 11:43 pm
by spazz
Wow,great pictures I am goin to do the intake on my af05e I didn't think I could go that far, and dig, using that gasket for the template, on the bost port. Simple.
A question: the bracing in the port, I would have never thought structural, but you say it is (I belive you that it is). I removed the stock air box bracket (the bump on the casing,I cut it off and ground it smooth) that makes me wonder if I have maybe weakend my casing (no chance of an air leak there though).
Sorry for jacking your thread, great work so far. Very inspiring!
Re: Boost and intake modifications
Posted: Sat Jan 03, 2015 8:45 am
by DirtyE
I think most of the structure support comes from the wall behind the pulleys.
Re: Boost and intake modifications
Posted: Sat Jan 03, 2015 1:55 pm
by patthesoundguy
happy new year everyone! ive been so busy with work i havent been around for a while and the first post i see is this awesome work!
looks super and makes me happy

Re: Boost and intake modifications
Posted: Sat Jan 03, 2015 2:53 pm
by DirtyE
So I did a little reading up on transfer ports and exhaust ports and how well they should be smoothed out. Its funny where you'll find info on two strokes and maybe questionable how relevant it is based on the info I pulled was from chainsaw and motocross forums, but this is what I got from a few hours of reading last night:
For transfer and intake ports, a 600 grit sandpaper is likely what Ill use.
For exhaust I didn't find any debate that polished is the way to go. A smooth transition from the exhaust port of cylinder to the exhaust is also very effective. I prefer pipes that have a detachable flange so I can mate the flange to the cylinder then smooth is out with the gasket in place, then mount the rest of the pipe later. This is one of the qualities of the Yasuni that Im looking forward to.
Other ideas are that possibly polishing the combustion chamber is effective. Removing casting defects from the transfers is also recommended(as many of you probably already know), but like mentioned above, smooth with a 600 grit sandpaper.
My current thoughts on knife-edging after reading information posted on the internet(to be taken with a grain of salt in most cases), it creates turbulence. An abrupt flow in any direction really. That's not a good thing when you're looking for mixture to flow smoothly. People often refer to an airplane wing when talking about knife edging. I never liked that analogy. After all, an airplane wing is designed to keep a plane in the air. We're passing a gas mixture through a cylinder. What I read that made most sense to me was the shape of a falling raindrop. It falls with a fat round front trailing off to a peak of a rear. Ill apply this to my intake port bridge, leaving the front side round, and the trail edge knive edged.
Thoughts on all of this now are that the overall effects on power this will have a pretty minimal. Beneficial, but minimal. What matters the most is that the cases and the cylinder are matched as well as possible so that the cylinder can function as it was designed to. Port timing and duration. Since I really don't know what I am doing porting a cylinder Ill probably leave my cylinder alone for the most part, just making sure that the edges have a nice roundness to them, and that ports open exactly at the same time when opening(on the downstroke).
My thoughts, not fact.
Re: Boost and intake modifications
Posted: Fri Feb 13, 2015 6:58 pm
by S4Patrick
Fantastic pictures & progress.....
How's this build coming along now?
Re: Boost and intake modifications
Posted: Fri Feb 13, 2015 9:06 pm
by DirtyE
Well, I'd like to post pics up, but the ct manifold is mounted so I cant show what I really want to. The area circled red in the above pic was smoothed to flow with the manifold. My cases are together now, but I havent mounted my cylinder yet. Im not gonna mount the cylinder until I get the pipe from g9 cause im gonna mount the flange of the pipe first, then smooth it so the cylinder to pipe transition is flawless. So here's my parts list;
-ported fabrizi 189 exhaust, 125 transfers and boost
-flowed cases, boost and transfers matched
-malossi crank
-malossi cdi
-polini for ruckus vario
-zx trans rear pulley
-polini 3 shoe clutch and sexy bell
-ct manifold with Naraku reedblock
-polini 26mm pwk flatslide
I've also got some cosmetics to sex it up....jdm tail, pg brake levers, black metropolitan rims with fresh rubber.
My plastics are beat. I proxies the cracks, sanded and painted them, but theyre so damaged they still look like poo.
Stock gears for now. I did a little research and I was meaning to ask trafficjamz to run some math for me. The stock elite gearing is around 12:1. I was happy with my stock zuma final reduction of 13:1. I understand though that the zuma runs a larger rear wheel, so final reduction doesn't actually have the final say.
Re: Boost and intake modifications
Posted: Sat Feb 14, 2015 1:27 am
by deuce217
Nice work. I have a whole metal fab shop and have not gone that far on my blocks YET. But when I do its on. Good luck on the build and keep us in the know.
